如何使用 Tmuxp 来优雅的管理多个 Tmux 会话

Posted by Mike on 2021-05-06

使用 tmuxp 可以很好的帮助我们来管理 tmux 的会话(session),解决了平时在使用 tmux 工具时候的痛点。

1. 工具介绍

安装和使用都非常简单

事实上,tmuxp 也是一个构建于 tmux 之上的对象关系映射的 ORMAPI 工具,就是利用 tmux 工具定义的窗格(pane)、窗口(windows)和会话(session),以创建关联视图的 Server, Session, Window, Pane 对象。我们在使用的时候,可以使用 YAML, JSON 以及 dict 字配置项来启动我们配置好的窗口和面板。使用时候需要注意的是,只支持 tmux>=1.8 的版本。

  • 简洁的语法
    • 都支持在单独的命令中使用简短标记
  • 加载会话
    • 都是根据配置文件中加载 tmux 会话(session)
  • 多种格式支持
    • 可以使用 YAML, JSON 以及 dict 字配置项
1
2
3
4
5
6
7
8
9
10
11
12
# 只有这一种安装方式
$ pip install tmuxp
$ pip install --user tmuxp

# 配置zsh补全(.zshrc)
$ eval "$(_TMUXP_COMPLETE=source_zsh tmuxp)"

# 配置bash补全(.bashrc)
$ eval "$(_TMUXP_COMPLETE=source tmuxp)"

# 如果运行命令提示报错则执行如下命令即可
$ tmux kill-server
1
2
3
4
5
6
7
8
9
10
# 简洁的语法配置
session_name: shorthands
windows:
- window_name: long form
panes:
- shell_command:
- echo 'did you know'
- echo 'you can inline'
- shell_command: echo 'single commands'
- echo 'for panes'

2. 使用方式

只需要记住 load 这个一个命令其实就够了

tmuxp 工具将配置文件保存在 ~/.tmuxp 中或在项目目录下作为 ~/.tmuxp.{yaml,json} 独立出现。当然我们也可以使用其提供的命令,进行会话的相关操作和使用。下来就让我们一起去看看,如何使用吧!

  • [1] 加载会话(Load session)
    • Load a tmux workspace from each CONFIG.
1
2
3
4
5
6
7
8
9
# 使用方式
# session_name: 会话(Session)名称
# -h: tmux服务器的地址
# -L: tmux服务器的socket名,与tmux相同
# -S: tmux服务器的socket路径,与tmux相同
# -2: 强迫tmux的终端支持256色
# -8: 与-2类似,但是只支持88色
# --list=False: 列出可用的配置文件
$ tmuxp load [-h] [-L socket-name] [-S socket-path] [-2 | -8] [--list] [config]
1
2
3
4
5
6
7
8
9
10
# 通过配置文件路径加载
$ tmuxp load .
$ tmuxp load ./mysession.yaml
$ tmuxp load ~/workspaces/myproject.yaml

# 通过自定义会话名称加载
$ tmuxp load mysession

# 一次加载多个会话
$ tmuxp load mysession ./another/project/
  • [2] 冻结会话(Freeze sessions)
    • Snapshot a session into a config.
1
2
3
4
5
6
# 使用方式
# session_name: 会话(Session)名称
# -h: tmux服务器的地址
# -L: tmux服务器的socket名,与tmux相同
# -S: tmux服务器的socket路径,与tmux相同
$ tmuxp freeze [-h] [-L socket-name] [-S socket-path] session_name [session_name ...]
1
2
# 为tmux布局、窗格路径和窗口/会话名称创建快照
$ tmuxp freeze session-name
  • [3] 配置转换
    • Convert a tmuxp config between JSON and YAML.
1
2
3
# 使用方式
# config: 配置文件的绝对/相对路径
tmuxp convert [-h] config
1
2
# 可以互相转换JSON/YAML格式
$ tmuxp convert <filename>
  • [4] 配置导入
    • Import a teamocil/tmuxinator config.
1
2
3
4
5
# 使用方式
# config: 在 ~/.teamocil 和当前目录下查找yaml文件
# --list=False: 列出 ~/.teamocil 和当前工作目录下的配置文件
$ tmuxp import teamocil [-h] (--list | config)
$ tmuxp import tmuxinator [-h] (--list | config)

3. 面板窗口配置

主要介绍 tmux 面板的切分、启动目录、索引设定等操作

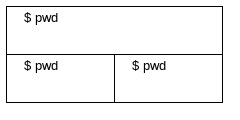
  • [1] 两个窗格(2 split panes)
    • 分割出两个窗格

1
2
3
4
5
6
session_name: 2-pane-vertical
windows:
- window_name: my test window
panes:
- echo hello
- echo hello
1
2
3
4
5
6
7
8
9
10
11
12
13
14
15
16
17
session_name: 2-pane-vertical-long
windows:
- window_name: test
panes:
- shell_command:
- cd ~
- pwd
- top
- shell_command:
- cd /var/www
- pwd
- window_name: second window
shell_command_before: cd /var/www
panes:
- shell_command: pwd
- shell_command:
- pwd
  • [2] 三个窗格(3 panes)

1
2
3
4
5
6
7
8
9
10
11
12
session_name: 3-panes
windows:
- window_name: dev window
layout: main-vertical
shell_command_before:
- cd ~/
panes:
- shell_command:
- cd /var/log
- ls -al | grep \.log
- echo hello
- echo hellotmu
  • [3] 四个窗格(4 panes)

1
2
3
4
5
6
7
8
9
10
11
12
13
session_name: 4-pane-split
windows:
- window_name: dev window
layout: tiled
shell_command_before:
- cd ~/
panes:
- shell_command:
- cd /var/log
- ls -al | grep \.log
- echo hello
- echo hello
- echo hello
  • [4] 空白窗格(Blank panes)
    • 直接可以使用 ‘null, ‘blank’, ‘pane’ 中任何一个,即可创建空白窗格
1
2
3
4
5
6
7
8
9
10
11
12
13
14
15
16
17
18
19
20
21
22
23
24
25
26
session_name: Blank pane test
windows:
# 如果之前没有shell命令将打开一个空白窗格
- window_name: Blank pane test
panes:
-
- pane
- blank
- window_name: More blank panes
panes:
- null
- shell_command:
- shell_command:
-
# 空字符串将被视为回车
- window_name: Empty string (return)
panes:
- ""
- shell_command: ""
- shell_command:
- ""
# 窗格可以有其他选项但仍然是空的
- window_name: Blank with options
panes:
- focus: true
- start_directory: /tmp
  • [5] 启动目录(Start Directory)
    • 设置起始目录
    • 等价于tmux new-window -c <start-directory>命令
1
2
3
4
5
6
7
8
9
10
11
12
13
14
15
16
17
18
19
20
21
22
23
24
25
26
27
28
29
30
31
32
33
34
35
36
37
38
39
40
session_name: start directory
start_directory: /var/
windows:
- window_name: should be /var/
panes:
- shell_command:
- echo "\033c
- it trickles down from session-level"
- echo hello
- window_name: should be /var/log
start_directory: log
panes:
- shell_command:
- echo '\033c
- window start_directory concatenates to session start_directory
- if it is not absolute'
- echo hello
- window_name: should be ~
start_directory: "~"
panes:
- shell_command:
- 'echo \\033c ~ has precedence. note: remember to quote ~ in YAML'
- echo hello
- window_name: should be /bin
start_directory: /bin
panes:
- echo '\033c absolute paths also have precedence.'
- echo hello
- window_name: should be config's dir
start_directory: ./
panes:
- shell_command:
- echo '\033c
- ./ is relative to config file location
- ../ will be parent of config file
- ./test will be \"test\" dir inside dir of config file'
- shell_command:
- echo '\033c
- This way you can load up workspaces from projects and maintain
- relative paths.'
  • [6] 窗口索引
    • 定义窗口索引,就是我们在使用时候用来切换窗口时使用
1
2
3
4
5
6
7
8
9
10
11
12
session_name: Window index example
windows:
- window_name: zero
panes:
- echo "this window's index will be zero"
- window_name: five
panes:
- echo "this window's index will be five"
window_index: 5
- window_name: one
panes:
- echo "this window's index will be one"

4. 面板窗口设置

工具系统方法的一些配置

  • [1] 环境变量
    • tmuxp中设置会话环境变量
1
2
3
4
5
6
7
8
9
session_name: Environment variables test
environment:
EDITOR: /usr/bin/vim
HOME: /tmp/hm
windows:
# 如果之前没有shell命令将打开一个空白窗格。
- window_name: Blank pane test
panes:
-
  • [2] 定制主面板高度(Main pane height)
    • 根据实际使用情况,设置主面板的高度
1
2
3
4
5
6
7
8
9
10
11
12
13
14
15
session_name: main-pane-height
start_directory: "~"
windows:
- layout: main-horizontal
options:
main-pane-height: 30
panes:
- shell_command:
- top
start_directory: "~"
- shell_command:
- echo "hey"
- shell_command:
- echo "moo"
window_name: my window name
  • [3] 终端历史
    • 用于配置是否需要记录终端命令历史
1
2
3
4
5
6
7
8
9
10
11
12
13
14
15
16
17
18
19
20
21
22
23
24
25
26
27
28
29
session_name: suppress
suppress_history: false
windows:
- window_name: appended
focus: true
suppress_history: false
panes:
- echo "window in the history!"

- window_name: suppressed
suppress_history: true
panes:
- echo "window not in the history!"

- window_name: default
panes:
- echo "session in the history!"

- window_name: mixed
suppress_history: false
panes:
- shell_command:
- echo "command in the history!"
suppress_history: false
- shell_command:
- echo "command not in the history!"
suppress_history: true
- shell_command:
- echo "window in the history!"
  • [4] 窗口选项
    • 创建窗格后设置窗口选项
    • 在创建过程中在每个窗格中执行单个命令后,对于“同步窗格”选项很有用
1
2
3
4
5
6
7
8
session_name: 2-pane-synchronized
windows:
- window_name: Two synchronized panes
panes:
- ssh server1
- ssh server2
options_after:
synchronize-panes: on
  • [5] 设置选项
    • 设置tmux工具相关的选项,例如全局(服务器范围)选项、会话选项和窗口选项
    • 包括automatic-rename,default-shell,default-command等相关命令
1
2
3
4
5
6
7
8
9
10
11
12
13
14
15
16
17
18
19
session_name: test window options
start_directory: "~"
global_options:
default-shell: /bin/sh
default-command: /bin/sh
options:
main-pane-height: ${MAIN_PANE_HEIGHT} # works with env variables
windows:
- layout: main-horizontal
options:
automatic-rename: on
panes:
- shell_command:
- man echo
start_directory: "~"
- shell_command:
- echo "hey"
- shell_command:
- echo "moo"
  • [6] 自动重命名(Automatic Rename)
    • 即可以自动命令创建的面板名称
1
2
3
4
5
6
7
8
9
10
11
12
13
14
session_name: test window options
start_directory: "~"
windows:
- layout: main-horizontal
options:
automatic-rename: on
panes:
- shell_command:
- man echo
start_directory: "~"
- shell_command:
- echo "hey"
- shell_command:
- echo "moo"
  • [7] 专注模式
    • 在专注模式中,可以确保在加载时附加和选择窗口和窗格
1
2
3
4
5
6
7
8
9
10
11
12
13
14
15
16
17
18
19
20
session_name: focus
windows:
- window_name: attached window
focus: true
panes:
- shell_command:
- echo hello
- echo 'this pane should be selected on load'
focus: true
- shell_command:
- cd /var/log
- echo hello
- window_name: second window
shell_command_before: cd /var/log
panes:
- pane
- shell_command:
- echo 'this pane should be focused, when window switched to first time'
focus: true
- pane

5. 测试开发配置

主要介绍在我们实际开发和测试当中应该如何使用该工具

  • [1] 定制高级开发环境
    • 作为开发环境时候的相关配置
1
2
3
4
5
6
7
8
9
10
11
12
13
14
15
16
17
18
19
20
21
22
23
24
25
session_name: tmuxp
start_directory: ./ # 加载相对于配置位置(项目根目录)的会话
before_script: pipenv install --dev --skip-lock
shell_command_before:
- "[ -d `pipenv --venv` ] && source `pipenv --venv`/bin/activate && reset"
windows:
- window_name: tmuxp
focus: True
layout: main-horizontal
options:
main-pane-height: 35
panes:
- focus: true
- pane
- make watch_test
- window_name: docs
layout: main-horizontal
options:
main-pane-height: 35
start_directory: doc/
panes:
- focus: true
- pane
- make serve
- make watch
  • [2] 自动引导
    • 新版本1.3.4:在脚本 CWD 进入根(会话)级启动目录之前
1
2
3
4
5
6
7
8
9
10
11
# 假设您的.tmuxp.yaml位于项目的根目录中
# 如果使用pipenv的话,则可以使用如下脚本来确保已安装软件包
session_name: my pipenv project
start_directory: ./
before_script: pipenv install --dev --skip-lock # 开发环境
windows:
- window_name: django project
focus: true
panes:
- blank
- pipenv run ./manage.py runserver
1
2
3
4
5
6
7
8
9
10
11
12
13
# 假设您的.tmuxp.yaml位于项目的根目录中
# 可以使用shell_command_before将自己置身于虚拟环境中
session_name: my pipenv project
start_directory: ./
before_script: pipenv install --dev --skip-lock # 开发环境
shell_command_before:
- "[ -d `pipenv --venv` ] && source `pipenv --venv`/bin/activate && reset"
windows:
- window_name: django project
focus: true
panes:
- blank
- ./manage.py runserver

6. 配置示例文件

这里就是其他人使用该工具的配置文件,可以借鉴和引用

  • laixintao
1
2
3
4
5
6
7
8
9
10
11
12
13
14
15
16
17
18
19
20
21
22
23
24
25
26
27
28
29
30
31
32
33
34
35
36
37
38
39
40
41
42
43
44
45
46
47
48
49
50
51
session_name: workspace
windows:
- focus: "true"
layout: 66e3,238x57,0,0,14
options:
automatic-rename: "off"
panes:
- pane
start_directory: /Users/laixintao/Program
window_name: vim
- layout: a5de,238x57,0,0{119x57,0,0,15,118x57,120,0[118x28,120,0,19,118x28,120,29,20]}
options:
automatic-rename: "off"
panes:
- focus: "true"
shell_command: zsh
-
-
start_directory: /Users/laixintao
window_name: operation
- layout: 66e5,238x57,0,0,16
options:
automatic-rename: "off"
panes:
- focus: "true"
shell_command: zsh
start_directory: /Users/laixintao
window_name: shell
- layout: 66e6,238x57,0,0,17
options:
automatic-rename: "off"
panes:
- focus: "true"
shell_command: zsh
start_directory: /Users/laixintao
window_name: shell
- layout: 66e7,238x57,0,0,18
options:
automatic-rename: "off"
panes:
- focus: "true"
shell_command: zsh
start_directory: /Users/laixintao
window_name: shell
- layout: main-vertical
options:
automatic-rename: "off"
panes:
- focus: "true"
shell_command: clash > /tmp/clash.log
window_name: <clash>
  • vcspull
1
2
3
4
5
6
7
8
9
10
11
12
13
14
15
16
17
18
19
20
21
22
23
24
25
session_name: vcspull
start_directory: ./
before_script: pipenv install --dev --skip-lock
shell_command_before:
- "[ -d `pipenv --venv` ] && source `pipenv --venv`/bin/activate && reset"
windows:
- window_name: vcspull
focus: True
layout: main-horizontal
options:
main-pane-height: 35
panes:
- focus: true
- pane
- make watch_test
- window_name: docs
layout: main-horizontal
options:
main-pane-height: 35
start_directory: doc/
panes:
- focus: true
- pane
- make serve
- make watch
  • dockerfiles
1
2
3
4
5
6
7
8
9
10
11
12
13
14
15
16
17
18
19
20
21
22
23
24
25
26
27
28
29
30
31
32
33
34
35
36
37
38
39
40
41
42
43
44
45
session_name: docker
start_directory: ./
windows:
- window_name: dockerfiles
layout: 6da5,239x56,0,0[239x34,0,0,65,239x21,0,35{119x21,0,35,66,119x21,120,35,67}]
options:
automatic-rename: "off"
panes:
- shell_command:
- vim
- :e README.rst
- pane
- pane
- window_name: docs
layout: main-horizontal
options:
main-pane-height: 35
shell_command_before:
- command -v virtualenv >/dev/null 2>&1 || { pip install virtualenv; }
- "[ -d .env -a -f .env/bin/activate ] && source .env/bin/activate || virtualenv .env"
- "[ ! -d .env/build ] || rm -rf .env/build"
- cd ./doc
- command -v .env/bin/tmuxp >/dev/null 2>&1 || { pip install -r requirements.pip; }
panes:
- shell_command:
- reset
- vim
- :Ex
focus: true
- pwd
- echo 'docs built to <http://0.0.0.0:8007/_build/html>'; python -m SimpleHTTPServer 8007
- shell_command:
- command -v watching_testrunner >/dev/null 2>&1 || { pip install watching_testrunner; }
- watching_testrunner --basepath ./ --pattern="*.rst" 'make html'
- window_name: postgresql
layout: 6da5,239x56,0,0[239x34,0,0,65,239x21,0,35{119x21,0,35,66,119x21,120,35,67}]
options:
automatic-rename: "off"
start_directory: postgresql
panes:
- shell_command:
- vim
- :e Dockerfile
- pane
- pane
  • sphinxcontrib
1
2
3
4
5
6
7
8
9
10
11
12
13
14
15
16
17
18
19
20
21
22
23
24
25
26
27
28
29
30
31
32
33
34
35
36
session_name: sphinxcontrib-github
start_directory: ./
windows:
- options:
main-pane-height: 35
layout: main-horizontal
panes:
- shell_command:
- vim
focus: true
- pane
- pane
window_name: sphinxcontrib-github
- window_name: docs
layout: main-horizontal
options:
main-pane-height: 35
shell_command_before:
- command -v virtualenv >/dev/null 2>&1 || { pip install virtualenv; }
- '[ -d .env -a -f .env/bin/activate ] && source .env/bin/activate || virtualenv .env'
- '[ ! -d .env/build ] || rm -rf .env/build'
- command -v .env/bin/tmuxp >/dev/null 2>&1 || { pip install -e .; }
- cd ./doc
panes:
- shell_command:
- reset
- vim
- :Ex
focus: true
- pane
- echo 'docs built to <http://0.0.0.0:8005/_build/html>'; python -m SimpleHTTPServer 8005
- shell_command:
- command -v sphinx-quickstart >/dev/null 2>&1 || { pip install -r requirements.pip; }
- command -v watching_testrunner >/dev/null 2>&1 || { pip install watching_testrunner; }
- watching_testrunner --basepath ./ --pattern="*.rst" 'make html'
Terms

本文转载自:「 Escape 的博客 」,原文:https://tinyurl.com/y5zsckzv,版权归原作者所有。欢迎投稿,投稿邮箱: editor@hi-linux.com