1. 前言
DoH(DNS over HTTPS),顾名思义,使用HTTPS协议执行DNS查询,除了最常用的UDP外,还有DoT(DNS over TLS),DNS over HTTP(服务提供商自定义)等方案,对比如下:
| 协议 | 标准 | 描述 |
|---|---|---|
| DNS over HTTPS | RFC8484 | 使用TLS加密的HTTP/2执行DNS查询 |
| DNS over TLS | RFC7858 | 使用TLS加密的TCP执行DNS查询 |
| DNS over HTTP | 服务提供商自定义 | 使用自定义加密的HTTP/1.1执行DNS查询 |
移动端的DNS优化已经有很多实践,最常见的是DNS over HTTP,通过加密的HTTP请求规避运营商对DNS的UDP包劫持,从而优化App访问服务器的延迟。但这个方案并没有形成统一的标准,通常需要内嵌DNS服务提供商的SDK,通过访问固定的BGP或任播IP获取DNS响应。
大概是意识到DNS在移动互联网中的扮演越来越重要的角色,在DoT和DoH的规范相继推出后,许多DNS服务提供商都跟进了部署,国内的阿里云、DNSPod,国外的谷歌、Cloudflare等目前已经推出了免费的DoT和DoH服务。
客户端方面,常用的Chrome、FireFox已经支持了自定义DoH服务器,macOS、iOS也可通过配置文件设置系统范围的默认DoH服务器。
笔者也正好有一个自定义DNS的需求:
- 需要针对一些域名的DNS查询仅返回IPv4记录
- 使用的某某路由器系统的自定义DNS服务仅支持设置UDP和DoH
- UDP模式默认使用53端口,不可修改,UDP包容易遭受干扰
- DoH可自定义域名、端口且使用HTTP2作为传输协议,稳定性更强
综上,只有自建DoH服务了,于是就有了下面的折腾,最后测试时发现这个傻瓜路由器系统只支持一些特定的DoH服务商如阿里云DNS、DNSPod等,不支持自建的DoH服务。
2. 部署方案
DoH本质上就是一个HTTP请求,只是目前协议定义要求启用TLS与HTTP/2。最初没有跑通coredns的DoH时,使用了nginx作为前端转发DoH请求到doh-server,然后doh-server使用本地的coredns服务作为上游。
最近再仔细研究了下文档,发现coredns已经支持了DoH服务,可直接对外暴露服务,或者通过nginx转发来复用已经部署好的web服务。
2.1 nginx + doh-server + coredns
https://github.com/m13253/dns-over-https 是一个提供 DNS over HTTP 的服务,需要一个web前端和一个DNS后端,可用的docker镜像地址为:satishweb/doh-server,使用doh-server时,DNS请求流转如下:
1 | HTTP Service -> doh-server -> DNS Server |
RFC8484中指定使用/dns-query路径作为默认查询路径,因此只需要将该路径前缀的请求转发到doh-server即可,如下:
nginx配置(已配置好TLS与HTTP2)
1 | server { |
doh-server
使用hostNetwork模式启动服务,监听8053端口
1 | docker run -d --restart unless-stopped --network host --name doh-server \ |
coredns
coredns配置文件如下
1 | ➜ ~ tree /etc/coredns/ |
使用hostNetwork模式启动服务,监听53端口
1 | docker run -d --restart unless-stopped --network host --name coredns \ |
服务启动后,我们可以得到一个自定义的DoH服务:https://doh.wbuntu.com/dns-query
2.2 coredns
目前coredns支持作为DoH服务端,不支持连接上游DoH服务器,上游服务器可使用UDP和DoT。
直接对外暴露服务需要使用有效的TLS证书,coredns配置文件及证书位置如下:
1 | ➜ ~ tree /etc/coredns/ |
使用hostNetwork模式启动服务,监听443端口
1 | docker run -d --restart unless-stopped --network host --name coredns \ |
服务启动后,我们可以得到一个自定义的DoH服务:https://doh.wbuntu.com/dns-query
2.3 nginx + coredns
直接暴露coredns服务到公网需要占用端口,coredns在未配置TLS证书时,可使用nginx作为前端来复用web服务,如下:
nginx配置(已配置好TLS与HTTP2)
1 | server { |
coredns
coredns配置文件如下
1 | ➜ ~ tree /etc/coredns/ |
使用hostNetwork模式启动服务,监听8053端口
1 | docker run -d --restart unless-stopped --network host --name coredns \ |
服务启动后,我们可以得到一个自定义的DoH服务:https://doh.wbuntu.com/dns-query
3. 测试
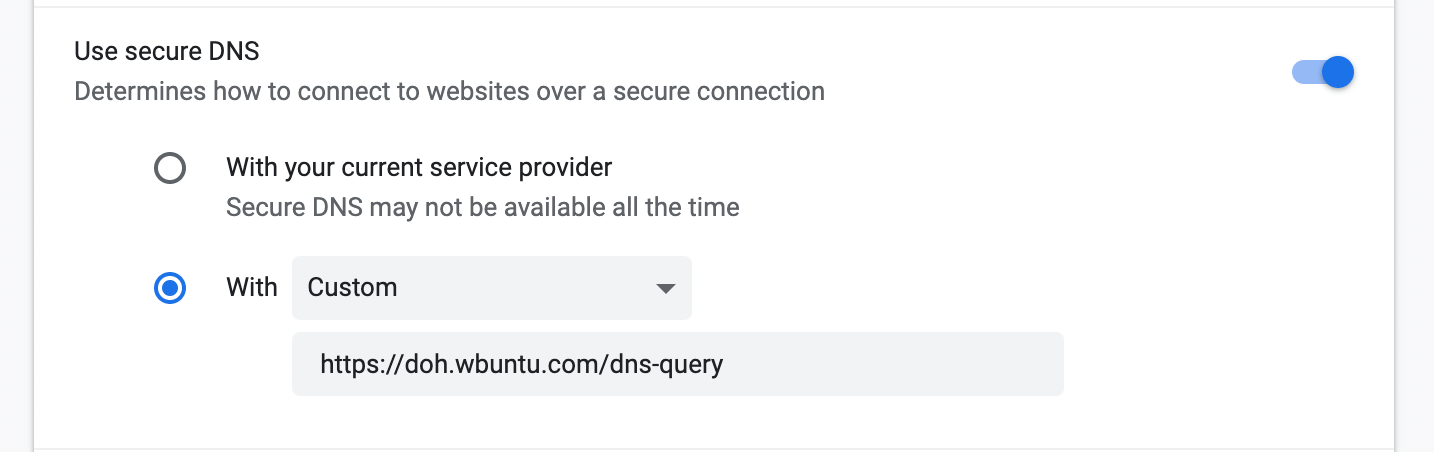
使用谷歌浏览器配置DoH服务:Settings -> Secutiry and Privacy -> Secutiry -> Advanced -> Use secure DNS
使用Go代码测试:github.com/mikumaycry/example/blob/main/2021/doh/main.go
1 | package main |
本文转载自:「 Wbuntu 的博客 」,原文:https://wbuntu.com/deploy-a-doh-service/ ,版权归原作者所有。欢迎投稿,投稿邮箱: editor@hi-linux.com。