Codis简介
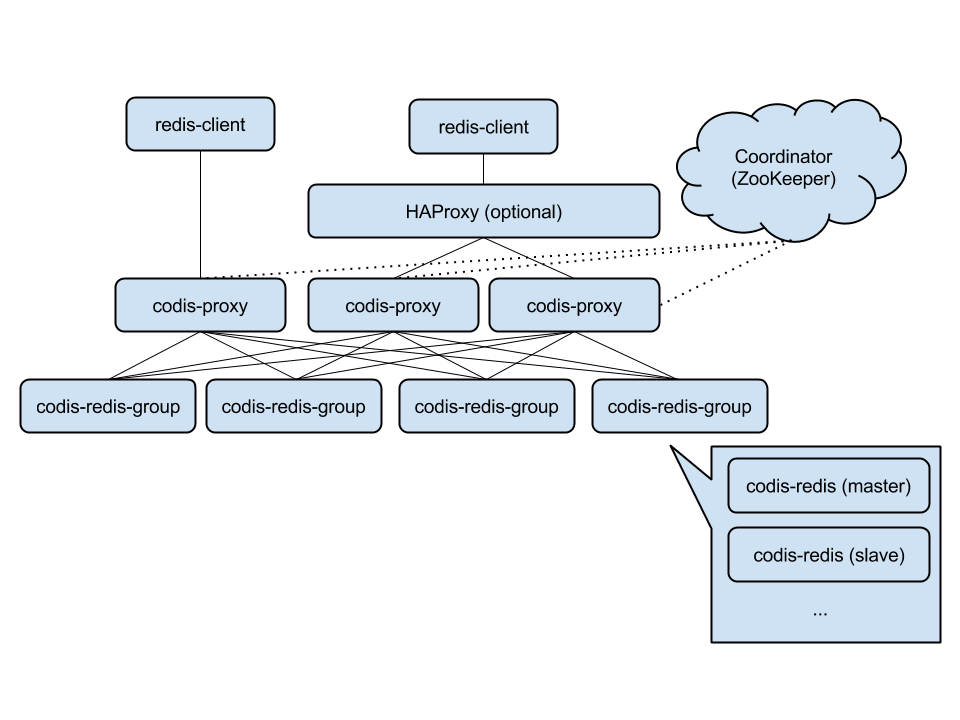
Codis是豌豆荚使用Go和C语言开发、以代理的方式实现的一个Redis分布式集群解决方案,且完全兼容Twemproxy。Twemproxy对于上一层的应用来说, 连接Codis Proxy(Redis代理服务)和连接原生的Redis服务器没有明显的区别,上一层应用能够像使用单机的Redis一样对待。Codis底层会处理请求的转发、不停机的数据迁移等工作, 所有底层的一切处理, 对于客户端来说是透明的。总之,可以简单的认为后台连接的是一个内存无限大的Redis服务。Codis遵循MIT开源协议发布,更多关于Codis的信息请登录其在GitHub的主页查看。
Codis是一个分布式Redis解决方案, 对于上层的应用来说, 连接到Codis Proxy和连接原生的Redis Server没有明显的区别(不支持的命令列表), 上层应用可以像使用单机的Redis一样使用, Codis底层会处理请求的转发, 不停机的数据迁移等工作, 所有后边的一切事情, 对于前面的客户端来说是透明的, 可以简单的认为后边连接的是一个内存无限大的Redis服务。
Codis 由四部分组成:
Codis Proxy (codis-proxy)
codis-proxy是客户端连接的Redis代理服务, codis-proxy本身实现了Redis协议, 表现得和一个原生的Redis没什么区别(就像Twemproxy), 对于一个业务来说, 可以部署多个codis-proxy, codis-proxy本身是无状态的. 可以执行多个Codis Dashboard(codis-config)是Codis的管理工具, 支持包括, 添加/删除 Redis 节点, 添加/删除Proxy节点, 发起数据迁移等操作. codis-config本身还自带了一个 http server, 会启动一个dashboard, 用户可以直接在浏览器上观察Codis集群的运行状态。
Codis Redis(codis-server)是Codis项目维护的一个Redis分支, 基于2.8.21开发, 加入了slot的支持和原子的数据迁移指令. Codis上层的codis-proxy和codis-config只能和这个版本的Redis交互才能正常运行。
Codis依赖ZooKeeper来存放数据路由表和codis-proxy节点的元信息, codis-config 发起的命令都会通过ZooKeeper同步到各个存活的codis-proxy。
Codis支持按照Namespace区分不同的产品, 拥有不同的product name 的产品, 各项配置都不会冲突。
Codis架构
安装并测试Codis 本文使用Codis分支的2.0版本,也是很多公司正在用的版本,Codis3.0版本已经有分支了,但是有线上使用的用户不确定。Codis3.0可以不依赖zookeeper,dashboard和proxy直接通过HTTP方式通讯。出于稳定性考虑,我们还是用目前的版本,避免在新版本上踩坑。
Codis新增一个group的概念,每个group包含一个Redis Master和至少一个Redis Slave。Codis可以支持数据热迁移.Codis采用预先分片机制,分成1024个slots,也就是最多可以支持1024个Codis server,这些信息保存在zookeeper中。
安装GO语言和编译安装codis Codis由Go语言写的,所以需要安装Go语言包
安装go 1 2 3 4 5 6 7 8 9 10 11 12 13 14 15 16 17 18 wget https://storage.googleapis.com/golang/go1.6.linux-amd64.tar.gz wget http://golangtc.com/static/go/1.6/go1.6.linux-amd64.tar.gz tar -C /usr/local -xzf go1.6.linux-amd64.tar.gz 配置环境变量 vi /etc/profile 在最后添加: export GOROOT=/usr/local /goexport PATH=$PATH :$GOROOT /bin保存,执行: source /etc/profile判断go是否安装成功,运行go version [root@centos6 local ] go version go1.6 linux/amd64 也可以yum安装:
安装codis 1 2 3 4 5 6 7 8 9 10 yum groupinstall "Development Tools" mkdir $HOME /goproj export GOPATH=$HOME /goprojexport PATH=$PATH :$GOROOT /bin:$GOPATH /bingo get -u -d github.com/CodisLabs/codis cd $GOPATH /src/github.com/CodisLabs/codismake make gotest
这里需要注意的是,最好按照Codis的文档使用go get载codis,我尝试过自己下载需要的依赖包然后编译codis,但是总是报错说是GOPATH设置不正确。这里对于初次接触GO项目编译的人来说有点诡异。
编译完成后会在bin目录下生成3个二进制文件
codis-config Codis的管理工具,支持添加/删除Redis节点,添加/删除Proxy节点,执行Auto Rebalance等操作
codis-server Codis 项目维护的一个Redis分支, 基于2.8.21开发, 加入了slot的支持和原子的数据迁移指令. Codis上层的codis-proxy和codis-config只能和这个版本的Redis交互才能正常运行.
codis-proxy 是客户端连接的 Redis 代理服务, codis-proxy本身实现了Redis协议, 表现得和一个原生的Redis没什么区别(就像 Twemproxy), 对于一个业务来说, 可以部署多个codis-proxy, codis-proxy本身是无状态的.
Codis 支持按照 Namespace 区分不同的产品, 拥有不同的product name的产品, 各项配置都不会冲突
另外值得注意的是
bin/assets文件夹是codis-config的dashboard http服务需要的前端资源, 需要和codis-config放置在同一文件夹下。
把Codis编译完成后直接复制bin目录下的codis-proxy,codis-config,codis-server三个二进制文件和assets资源目录到其他机器上也是可以直接运行的。目标主机不一定安装有go语言。
常用命令维护说明 1 2 3 4 5 6 7 8 9 10 11 12 13 14 15 16 17 18 19 20 21 22 23 24 25 26 27 28 29 30 31 32 33 34 35 36 37 38 39 40 41 42 43 44 45 46 47 48 49 50 51 52 53 54 55 56 57 58 59 60 61 62 63 64 65 66 67 68 69 70 71 72 73 74 75 76 77 78 79 80 81 82 83 84 85 86 87 88 89 90 91 92 93 94 server: 主要用来添加,删除,提权,查找 server group(实际操作zookeeper) ./codis-config server --help codis-config server list codis-config server add <group_id> <redis_addr> <role> codis-config server remove <group_id> <redis_addr> codis-config server promote <group_id> <redis_addr> codis-config server add-group <group_id> codis-config server remove-group <group_id> slot: 主要用来初始化,迁移,设置range-set,查询slot ./codis-config slot --help usage: codis-config slot init [-f] codis-config slot info <slot_id> codis-config slot set <slot_id> <group_id> <status> codis-config slot range-set <slot_from> <slot_to> <group_id> <status> codis-config slot migrate <slot_from> <slot_to> <group_id> [--delay=<delay_time_in_ms>] codis-config slot rebalance [--delay=<delay_time_in_ms>] dashboard: 主要用来启动dashboard ./codis-config dashboard --help usage: codis-config dashboard [--addr=<address>] [--http-log=<log_file>] options: --addr listen ip:port, e.g. localhost:12345, :8086, [default: :8086] --http-log http request log [default: request.log ] action: 主要用来操作codis保存的事件记录,并解除zk锁(迁移异常会出现锁) ./codis-config action --help usage: codis-config action (gc [-n <num> | -s <seconds>] | remove-lock) options: gc: gc -n N gc -s Sec keep last N actions; keep last Sec seconds actions; remove-lock force remove zookeeper lock; proxy: 主要用来实现proxy上线,下线,查询 ./codis-config proxy usage: codis-config proxy list codis-config proxy offline <proxy_name> codis-config proxy online <proxy_name> codis-proxy 主要用来启动proxy进程 ./codis-proxy --help usage: proxy [-c <config_file>] [-L <log_file>] [--log -level=<loglevel>] [--cpu=<cpu_num>] [--addr=<proxy_listen_addr>] [--http-addr=<debug_http_server_addr>] options: -cset config file -Lset output log file, default is stdout --log -level=<loglevel> set log level: info, warn, error, debug [default: info] --cpu=<cpu_num> num of cpu cores that proxy can use --addr=<proxy_listen_addr> proxy listen address, example: 0.0.0.0:9000 --http-addr=<debug_http_server_addr> debug vars http server codis-server 主要用来启动 codis(redis 实例) ./codis-server --help Usage: ./redis-server [/path/to/redis.conf] [options] ./redis-server - (read config from stdin) ./redis-server -v or --version ./redis-server -h or --help ./redis-server --test -memory <megabytes> Examples: ./redis-server (run the server with default conf) ./redis-server /etc/redis/6379.conf ./redis-server --port 7777 ./redis-server --port 7777 --slaveof 127.0.0.1 8888 ./redis-server /etc/myredis.conf --loglevel verbose Sentinel mode: ./redis-server /etc/sentinel.conf –sentinel codis-ha 主要来实现 server_group 中的主从 ha ./codis-ha --help Usage of ./codis-ha: -codis-config="localhost:18087" : api server address -productName="test" : product name, can be found in codis-proxy's config
Codis不支持的命令 1 KEYS, MOVE, OBJECT, RENAME, RENAMENX, SORT, SCAN, BITOP,MSETNX, BLPOP, BRPOP, BRPOPLPUSH, PSUBSCRIBE,PUBLISH, PUNSUBSCRIBE, SUBSCRIBE, UNSUBSCRIBE, DISCARD, EXEC, MULTI, UNWATCH, WATCH, SCRIPT EXISTS, SCRIPT FLUSH, SCRIPT KILL, SCRIPT LOAD, AUTH, ECHO, SELECT, BGREWRITEAOF, BGSAVE, CLIENT KILL, CLIENT LIST, CONFIG GET, CONFIG SET, CONFIG RESETSTAT, DBSIZE, DEBUG OBJECT, DEBUG SEGFAULT, FLUSHALL, FLUSHDB, INFO, LASTSAVE, MONITOR, SAVE, SHUTDOWN, SLAVEOF, SLOWLOG, SYNC, TIME、MIGRATE、RANDOMKEY、PSUBSCRIBE、PUBLISH、PUNSUBSCRIBE、BGREWRITEAOF、RESTORE、SLOTSCHECK、SLOTSDEL、SLOTSINFO、SLOTSMGRTONE、SLOTSMGRTSLOT、SLOTSMGRTTAGONE、SLOTSMGRTTAGSLOT
Codis半支持的命令 需要将以下key放入同一slot才能支持,方式采用{},如key为"bar{zap}",则只会对zap进行hash
1 RPOPLPUSH、SDIFF、SINTER、SINTERSTORE、SMOVE、SUNION、SUNIONSTORE、ZINTERSTORE、ZUNIONSTORE、PFMERGE、EVAL、EVALSHA
安装JDK zookeeper依赖java环境,所以要先安装JDK。
1 2 wget --no-cookies --no-check-certificate --header "Cookie: oraclelicense=accept-securebackup-cookie" rpm" -O jdk-7u65-linux-x64.rpm rpm -ivh jdk-7u65-linux-x64.rpm
安装和配置zookeeper 1 2 3 4 wget http://www.us.apache.org/dist/zookeeper/zookeeper-3.4.6/zookeeper-3.4.6.tar.gz tar zxvf zookeeper-3.4.6.tar.gz cd zookeeper-3.4.6/conf/cp zoo_sample.cfg zoo.cfg
部署zookeeper集群 1 2 3 cp -rf zookeeper-3.4.6 zookeeper-1 cp -rf zookeeper-3.4.6 zookeeper-2 cp -rf zookeeper-3.4.6 zookeeper-3
1 2 mkdir -p /var/local /zookeeper/data{1..3} mkdir -p /var/local /zookeeper/logs{1..3}
1 2 3 4 5 6 7 8 9 10 11 12 13 14 15 16 17 18 19 20 21 22 23 24 25 26 27 28 29 30 vim /opt/zookeeper-1/conf/zoo.cfg tickTime=2000 initLimit=10 syncLimit=5 dataDir=/var/local /zookeeper/data1 dataLogDir=/var/local /zookeeper/logs1 clientPort=2181 server.1=server01:2887:3887 server.2=server01:2888:3888 server.3=server01:2889:3889 vim /opt/zookeeper-2/conf/zoo.cfg tickTime=2000 initLimit=10 syncLimit=5 dataDir=/var/local /zookeeper/data2 clientPort=2182 server.1=192.168.119.100:2887:3887 server.2=192.168.119.100:2888:3888 server.3=192.168.119.100:2889:3889 vim /opt/zookeeper-3/conf/zoo.cfg tickTime=2000 initLimit=10 syncLimit=5 dataDir=/var/local /zookeeper/data3 clientPort=2183 server.1=192.168.119.100:2887:3887 server.2=192.168.119.100:2888:3888 server.3=192.168.119.100:2889:3889
1 2 3 echo "1" >/var/local /zookeeper/data1/myidecho "2" >/var/local /zookeeper/data2/myidecho "3" >/var/local /zookeeper/data3/myid
1 2 3 /opt/zookeeper-1/bin/zkServer.sh start /opt/zookeeper-2/bin/zkServer.sh start /opt/zookeeper-3/bin/zkServer.sh start
1 2 3 4 5 6 7 8 9 10 11 12 13 14 /opt/zookeeper-1/bin/zkServer.sh status JMX enabled by default Using config: /opt/zookeeper-1/bin/../conf/zoo.cfg Mode: follower /opt/zookeeper-2/bin/zkServer.sh status JMX enabled by default Using config: /opt/zookeeper-2/bin/../conf/zoo.cfg Mode: leader /opt/zookeeper-3/bin/zkServer.sh status JMX enabled by default Using config: /opt/zookeeper-3/bin/../conf/zoo.cfg Mode: follower
三种类型的节点
当leader重启或宕机后,通过paxos算法,重新选出Leader,并以Leader为准,进行数据同步;
1 2 3 4 5 6 7 8 9 10 11 12 13 14 15 16 17 18 19 20 21 22 23 24 25 26 27 28 29 30 31 32 /opt/zookeeper-1/bin/zkCli.sh -server 192.168.119.100:2181 Connecting to 192.168.119.100:2181 2016-03-25 13:35:12,972 [myid:] - INFO [main:Environment@100] - Client environment:zookeeper.version=3.4.6-1569965, built on 02/20/2014 09:09 GMT 2016-03-25 13:35:12,974 [myid:] - INFO [main:Environment@100] - Client environment:host.name=localhost 2016-03-25 13:35:12,974 [myid:] - INFO [main:Environment@100] - Client environment:java.version=1.8.0_65 2016-03-25 13:35:12,987 [myid:] - INFO [main:Environment@100] - Client environment:java.vendor=Oracle Corporation 2016-03-25 13:35:12,987 [myid:] - INFO [main:Environment@100] - Client environment:java.home=/usr/java/jdk1.8.0_65/jre 2016-03-25 13:35:12,987 [myid:] - INFO [main:Environment@100] - Client environment:java.class.path=/opt/zookeeper-1/bin/../build/classes:/opt/zookeeper-1/bin/../build/lib/*.jar:/opt/zookeeper-1/bin/../lib/slf4j-log4j12-1.6.1.jar:/opt/zookeeper-1/bin/../lib/slf4j-api-1.6.1.jar:/opt/zookeeper-1/bin/../lib/netty-3.7.0.Final.jar:/opt/zookeeper-1/bin/../lib/log4j-1.2.16.jar:/opt/zookeeper-1/bin/../lib/jline-0.9.94.jar:/opt/zookeeper-1/bin/../zookeeper-3.4.6.jar:/opt/zookeeper-1/bin/../src/java/lib/*.jar:/opt/zookeeper-1/bin/../conf:.:/usr/java/jdk1.8.0_65//lib/dt.jar:/usr/java/jdk1.8.0_65//lib/tools.jar 2016-03-25 13:35:12,987 [myid:] - INFO [main:Environment@100] - Client environment:java.library.path=/usr/java/packages/lib/amd64:/usr/lib64:/lib64:/lib:/usr/lib 2016-03-25 13:35:12,987 [myid:] - INFO [main:Environment@100] - Client environment:java.io.tmpdir=/tmp 2016-03-25 13:35:12,987 [myid:] - INFO [main:Environment@100] - Client environment:java.compiler=<NA> 2016-03-25 13:35:12,987 [myid:] - INFO [main:Environment@100] - Client environment:os.name=Linux 2016-03-25 13:35:12,987 [myid:] - INFO [main:Environment@100] - Client environment:os.arch=amd64 2016-03-25 13:35:12,988 [myid:] - INFO [main:Environment@100] - Client environment:os.version=2.6.32-573.12.1.el6.x86_64 2016-03-25 13:35:12,988 [myid:] - INFO [main:Environment@100] - Client environment:user.name=root 2016-03-25 13:35:12,988 [myid:] - INFO [main:Environment@100] - Client environment:user.home=/root 2016-03-25 13:35:12,988 [myid:] - INFO [main:Environment@100] - Client environment:user.dir=/root 2016-03-25 13:35:12,989 [myid:] - INFO [main:ZooKeeper@438] - Initiating client connection, connectString=192.168.119.100:2181 sessionTimeout=30000 watcher=org.apache.zookeeper.ZooKeeperMain$MyWatcher @67424e82 Welcome to ZooKeeper! JLine support is enabled 2016-03-25 13:35:13,125 [myid:] - INFO [main-SendThread(192.168.119.100:2181):ClientCnxn$SendThread @975] - Opening socket connection to server 192.168.119.100/192.168.119.100:2181. Will not attempt to authenticate using SASL (unknown error) 2016-03-25 13:35:13,236 [myid:] - INFO [main-SendThread(192.168.119.100:2181):ClientCnxn$SendThread @852] - Socket connection established to 192.168.119.100/192.168.119.100:2181, initiating session [zk: 192.168.119.100:2181(CONNECTING) 0] 2016-03-25 13:35:13,345 [myid:] - INFO [main-SendThread(192.168.119.100:2181):ClientCnxn$SendThread @1235] - Session establishment complete on server 192.168.119.100/192.168.119.100:2181, sessionid = 0x153ab70dc7c0001, negotiated timeout = 30000 WATCHER:: WatchedEvent state:SyncConnected type :None path:null [zk: 192.168.119.100:2181(CONNECTED) 0] ls / [zk, zookeeper] [zk: 192.168.119.100:2181(CONNECTED) 1] ls /zookeeper [quota] [zk: 192.168.119.100:2181(CONNECTED) 2]
启动Codis服务 启动dashboard codis-config和codis-proxy使用config.ini这个配置文件,编辑配置文件
1 2 3 4 5 6 7 8 9 10 11 12 13 grep -v '#' config.ini|grep -v '^$' coordinator=zookeeper zk=192.168.119.100:2181,192.168.119.100:2182,192.168.119.100:2183 product=test dashboard_addr=192.168.119.100:18087 password= backend_ping_period=5 session_max_timeout=1800 session_max_bufsize=131072 session_max_pipeline=1024 zk_session_timeout=30000 proxy_id=proxy_1
1 bin/codis-config dashboard
我们在启动了dashboard后,他打印了一堆内容,如下
1 2 3 4 5 6 [code]2015/09/26 11:18:41 dashboard.go:160: [INFO] dashboard listening on addr: :18087 2015/09/26 11:18:41 dashboard.go:143: [INFO] dashboard node created: /zk/codis/db_test/dashboard, {"addr" : "localhost:18087" , "pid" : 1701} 2015/09/26 11:18:41 dashboard.go:144: [WARN] ********** Attention ********** 2015/09/26 11:18:41 dashboard.go:145: [WARN] You should use `kill {pid}` rather than `kill -9 {pid}` to stop me, 2015/09/26 11:18:41 dashboard.go:146: [WARN] or the node resisted on zk will not be cleaned when I'm quiting and you must remove it manually 2015/09/26 11:18:41 dashboard.go:147: [WARN] *******************************
是的,如内容说说的,如果要关闭,记得要kill -{pid}
要不然突然电脑没电之类的bug,导致异常退出的时候,就得手动关闭,要不然在下次启动的时候,就会遇到下面的内容:
1 2 3 4 5 6 7 8 9 10 11 12 13 14 bin/codis-config dashboard 2015/09/26 11:14:10 dashboard.go:160: [INFO] dashboard listening on addr: :18087 2015/09/26 11:14:10 dashboard.go:234: [PANIC] create zk node failed [error]: dashboard already exists: {"addr" : "192.168.0.123:18087" , "pid" : 30155} [stack]: 3 /usr/local /codis/src/github.com/wandoulabs/codis/cmd/cconfig/dashboard.go:234 main.runDashboard 2 /usr/local /codis/src/github.com/wandoulabs/codis/cmd/cconfig/dashboard.go:54 main.cmdDashboard 1 /usr/local /codis/src/github.com/wandoulabs/codis/cmd/cconfig/main.go:84 main.runCommand 0 /usr/local /codis/src/github.com/wandoulabs/codis/cmd/cconfig/main.go:151 main.main ... ...
备注:必须先启动zookeeper
通过NGINX代理认证访问dashboard
配置nginx
1 2 3 4 5 6 7 8 9 10 11 12 13 14 15 yum install -y nginx httpd vim /etc/nginx/conf.d/codis.conf 修改如下参数: server { listen 80; server_name 192.168.119.100; location / { auth_basic "codis auth" ; auth_basic_user_file /etc/nginx/passwd.db; proxy_set_header Host $host ; proxy_set_header X-Forwarded-For $remote_addr ; proxy_pass http://192.168.119.100:18087; } }
启动nginx
1 2 3 4 htpasswd -c /etc/nginx/passwd codis service nginx start chkconfig nginx on chkconfig httpd off
备注:因为codis的dashboard不支持认证访问,可以通过nginx代理做认证访问(htpasswd的apache的一个命令工具,用于生成http 基本认证的密码文件),可以用防火墙关闭18087端口。通过URL浏览器访问codis的dashboard。
初始化slots 初始化slots(codis-config上操作)
1 bin/codis-config slot init
该命令会在zookeepr上创建slot相关信息
重新初始化slot
1 2 3 4 5 bin/codis-config slot init -f { "msg" : "OK" , "ret" : 0 }
部署codis-server Codis Redis和普通的Redis启动方式一样的,这里创建4个Codis Redis实例,两两一组
1 2 3 4 Master 192.168.119.100:26379 Slave 192.168.119.100:26380 Master 192.168.119.100:26479 Slave 192.168.119.100:26480
1 2 3 4 5 6 7 8 9 10 11 12 13 14 15 16 17 18 19 20 echo "1" > /proc/sys/vm/overcommit_memoryecho "512" > /proc/sys/net/core/somaxconnvim /etc/sysctl.conf 修改如下参数: vm.overcommit_memory = 1 net.core.somaxconn = 512 让sysctl生效 sysctl -p 禁用大内存页面 echo "never" > /sys/kernel/mm/transparent_hugepage/enabled加入开机自启 vim /etc/rc.local 加入如下参数: if test -f /sys/kernel/mm/transparent_hugepage/enabled ; then echo never > /sys/kernel/mm/transparent_hugepage/enabled fi
1 2 3 4 cp extern/redis-2.8.21/redis.conf redis26379.conf cp extern/redis-2.8.21/redis.conf redis26380.conf cp extern/redis-2.8.21/redis.conf redis26479.conf cp extern/redis-2.8.21/redis.conf redis26480.conf
1 2 3 4 5 6 7 8 9 10 11 12 13 14 15 16 17 18 19 20 21 22 23 grep -v '#' redis26379.conf|egrep 'pidfile|port|dbfilename|slaveof' pidfile /var/run/redis26379.pid port 26379 dbfilename dump26379.rdb grep -v '#' redis26380.conf|egrep 'pidfile|port|dbfilename|slaveof' pidfile /var/run/redis26380.pid port 26380 dbfilename dump26380.rdb slaveof localhost 26379 grep -v '#' redis26479.conf|egrep 'pidfile|port|dbfilename|slaveof' pidfile /var/run/redis26479.pid port 26479 dbfilename dump26479.rdb grep -v '#' redis26480.conf|egrep 'pidfile|port|dbfilename|slaveof' pidfile /var/run/redis26480.pid port 26480 dbfilename dump26480.rdb slaveof localhost 26479
1 2 3 4 bin/codis-server redis26379.conf bin/codis-server redis26380.conf bin/codis-server redis26479.conf bin/codis-server redis26480.conf
备注:codis不是不负责维护主从,而是不会自动持续维护主从状态。在手动添加slave的时候会发送slave of指令,如果redis的slave of不写在配置文件里,重启会被重置。
配置Redis Server Group 每个Server Group就是一个Redis服务器组,包括一个Master和多个Slave,group id从1开始算起
1 2 3 4 bin/codis-config server add 1 localhost:26379 master bin/codis-config server add 1 localhost:26380 slave bin/codis-config server add 2 localhost:26479 master bin/codis-config server add 2 localhost:26480 slave
移除节点
1 2 bin/codis-config server remove-group 1 bin/codis-config server remove-group 2
备注:添加Redis Server Group,只允许有一个master,可以有多个slave,group id需要是大于等于1的整数。
设置server group服务的slot范围 Codis采用Pre-sharding的技术来实现数据的分片,默认分成1024个slots(0-1023),对于每个key通过公式SlotID=crc32(key)%1024确定属于哪个Slot,每个slot都会有一个且必须有一个特定的server group id来表示这个slot的数据由哪个server group来提供
例如:设置编号为[0, 511]的slot由server group 1 提供服务, 编号[512, 1023]的slot由server group 2提供服务
1 2 bin/codis-config slot range-set 0 511 1 online bin/codis-config slot range-set 512 1023 2 online
备注:Codis采用Pre-sharding 的技术来实现数据的分片,默认分成1024个slots (0-1023),每一个slot都会有一个特定的server group id,后端最多支持1024个Codis Server,路由信息保存在ZooKeeper中。
启动coids-proxy 1 2 3 4 5 6 bin/codis-proxy -c config.ini -L ./log /proxy.log --cpu=32 --addr=0.0.0.0:19000 --http-addr=0.0.0.0:11000 & 备注: --cpu 是codis-proxy 使用的CPU核数,根据主机的情况设置; --addr是codis-proxy的redis server监听地址; --http-addr是codis-proxy启动的http server,显示的调试信息可以访问 http://server_addr:port/debug/vars ;
启动dashboard时,codis管理界面端口为18087,10086的端口,实际上用不到;刚启动codis-proxy默认是处于offline的状态,需要设置为online状态
1 bin/codis-config -c config.ini proxy online proxy_1
设置proxy为offline
1 2 3 4 5 6 bin/codis-config proxy offline proxy_1 { "msg" : "OK" , "ret" : 0 } [5] Exit 1 bin/codis-proxy -c config.ini -L proxy.log --cpu=2 --addr=0.0.0.0:19000 --http-addr=0.0.0.0:11000
通过浏览器访问codis的管理界面:http://192.168.119.100:18087/admin/
测试 使用redis-benchmark随意写入一些数据
1 2 3 4 5 redis-benchmark -h 192.168.119.100 -p 19000 -n 500000 -P 100 -r 1048576 -d 256 -t get,set ,mset -c 800 -n 发起的请求总数 -P Pipeline请求数 -d SET/GET值大小 -c 并列连接的客户端数量
使用脚本插入数据
1 2 3 4 5 6 for i in {1..1000}do echo $i redis-cli -h 192.168.119.100 -p 19000 set name$i $i done
测试一下redis-master和redis-slave是否正常同步数据了
在redis-master上写数据
1 2 3 4 5 6 redis-cli -h 192.168.119.100 -p 26379 192.168.119.100:26379>set name test OK 192.168.119.100:26379>set age 24 OK 192.168.119.100:26379:7000>
在redis-slave查看是否把数据同步过来了
1 2 3 4 5 6 7 redis-cli -h 192.168.119.100 -p 26380 192.168.119.100:26380> get name "test" 192.168.119.100:26380> get age "29" 192.168.119.100:26380> 可以看到正常同步的。
下面做个测试,测试大体内容是
1)假设redis-master有问题,也可以理解为挂了
在上面已经测试了,在redis-master写数据,redis-slave上是可以看到数据同步过来的,现在在redis-slave上写数据,看主能不能看到
1 2 3 4 5 6 redis-cli -h 192.168.119.100 -p 26380 192.168.119.100:26380> set MySQL innodb OK 192.168.119.100:26380> get MySQL "innodb" 192.168.119.100:26380>
在redis-master查看
1 2 3 4 5 6 7 redis-cli -h 192.168.119.100 -p 26379 192.168.119.100:26379> keys * 1) "name" 2) "age" 192.168.119.100:26379> 可以看到,redis-slave写数据,是不会到master上的。
现在模拟redis-master down机
1 2 3 ps -ef |grep 26379 root 6466 1 0 09:28 ? 00:00:32 bin/codis-server *:26379 kill -9 6466
在web页面刷新可以看到master已经挂了
注意:现在26380端口的角色是master的了,在它上面写数据
1 2 3 4 5 6 redis-cli -h 192.168.119.100 -p 26380 192.168.119.100:26380> set aa bb OK 192.168.119.100:26380> set cc dd OK 192.168.119.100:26380>
新的redis-slave上查看数据也是就26379端口对应的redis
1 2 3 4 5 192.168.119.100:26379> get aa "bb" 192.168.119.100:26379> get cc "dd" 192.168.119.100:26379>
可以看到是正常同步的。
在线增加分片 添加redis master和slave到group 4
1 2 codis-config -c config.ini server add 4 10.13.43.144:6379 master codis-config -c config.ini server add 4 10.13.50.214:6380 slave
数据迁移 将slot id为[768-1023]的slot数据,迁移到 server group 4上,执行完命令后,数据会在后台迁移,web页面中可以看到迁移的状态。
1 codis-config -c $CODISCONF /config.ini slot migrate 768 1023 4
通过访问http://192.168.119.100:18087/slots
可以看到slots的排列情况,不同的Group是不同的颜色。这样作数据迁移后很容易看到slot迁移后的情况。
1 bin/codis-config slot migrate 0 511 2 --delay=10
正常的slots的状态是online,正在迁移的slots的状态是migrate
数据迁移migrate的问题
因为填错了组,所以导致这个迁移任务一致显示出错,reblance卡住不能动,对此的解决方法是,到zk下面的migrate_task里面删掉任务
1 2 3 4 sh /usr/local /zookeeper/bin/zkCli.sh ls /zk/codis/db_test/migrate_tasks #在显示的里面最小的那个任务号码。放到下面这一个去 delete /zk/codis/db_test/migrate_tasks/XXXXX任务号码XXXX
自动均衡 Codis支持动态的根据实例内存, 自动对slot进行迁移, 以均衡数据分布.
自动均衡slots分布需要满足几个条件
所有的codis-server都必须设置了maxmemory参数
1 2 3 4 5 管理界面 在管理界面点击Auto Rebalance 命令行方式 bin/codis-config slot rebalance
关于redis的配置maxmemory
为何要设置这个maxmemory呢,因为codes在做主从切换的时候,用的是codis-ha;
codis-ha实现codis-server的主从切换,codis-server主库挂了会提升一个从库为主库,从库挂了会设置这个从库从集群下线。 而这个codes-ha需要我们明确每个redis可以使用的最大内存。不能是NAN GB,所以需要我们配置这个属性。拉到redis自带的配置文件的中间地方,有下面这段,我们取消maxmemory的注释就好了。
1 2 3 4 5 6 7 8 9 10 11 12 13 14 15 16 17 18 19 20 21 22 23 24 maxmemory 1GB
codis-server的HA 当一个group的master挂掉的时候,codis不会自动的将某个slave升级成master,codis-ha实现codis-server的主从切换,codis-server主库挂了会提升一个从库为主库,从库挂了会设置这个从库从集群下线。
1 2 3 4 5 export GOPATH=$HOME /goprojcd $GOPATH go get github.com/ngaut/codis-ha cd src/github.com/ngaut/codis-hago build
1 ./codis-ha--codis-config=192.168.92.136:18087 --productName=test &
注:productName为集群项目名称,codis-config为codis dashboard地址。
使用supervisord管理codis-ha进程
1 2 3 4 5 6 7 8 9 10 11 12 yum -y install supervisord /etc/supervisord.conf中添加如下内容: [program:codis-ha] autorestart = True stopwaitsecs = 10 startsecs = 1 stopsignal = QUIT command = /root/goproj/src/github.com/ngaut/codis-ha --codis-config=192.168.92.136:18087 --productName=test user = root startretries = 3 autostart = True exitcodes = 0,2
1 2 /etc/init.d/supervisord start chkconfig supervisord on
此时,ps -ef |grep codis-ha你会发现codis-ha进程已经启动,这个时候你去停掉一个codis-server的master,看看slave会不会提升为master呢
常见错误处理 错误1:启动dashboard报错,提示已经存在pid文件
1 2 3 4 5 6 7 8 9 10 11 12 13 14 15 16 17 18 19 20 21 22 23 24 25 26 27 28 29 30 31 32 33 34 bin/codis-config -c config.ini dashboard & [1] 441 [root@Mike codis] 2015/09/15 10:23:05 dashboard.go:234: [PANIC] create zk node failed [error]: dashboard already exists: {"addr" : "10.19.21.241:18087" , "pid" : 12687} [stack]: 3 /usr/local /codis/src/github.com/wandoulabs/codis/cmd/cconfig/dashboard.go:234 main.runDashboard 2 /usr/local /codis/src/github.com/wandoulabs/codis/cmd/cconfig/dashboard.go:54 main.cmdDashboard 1 /usr/local /codis/src/github.com/wandoulabs/codis/cmd/cconfig/main.go:84 main.runCommand 0 /usr/local /codis/src/github.com/wandoulabs/codis/cmd/cconfig/main.go:151 main.main ... ... [1]+ Exit 1 bin/codis-config -c config.ini dashboard 解决办法: 到zk里删除dashboard /usr/local /zookeeper/bin/zkCli.sh Connecting to localhost:2181 ..... [zk: localhost:2181(CONNECTED) 6] delete /zk/codis/db_test/dashboard [zk: localhost:2181(CONNECTED) 7] quit bin/codis-config -c config.ini dashboard & [1] 623 [root@Mike codis] 2015/09/15 10:26:11 dashboard.go:143: [INFO] dashboard node created: /zk/codis/db_test/dashboard, {"addr" : "10.19.21.241:18087" , "pid" : 623} 2015/09/15 10:26:11 dashboard.go:144: [WARN] ********** Attention ********** 2015/09/15 10:26:11 dashboard.go:145: [WARN] You should use `kill {pid}` rather than `kill -9 {pid}` to stop me, 2015/09/15 10:26:11 dashboard.go:146: [WARN] or the node resisted on zk will not be cleaned when I'm quiting and you must remove it manually 2015/09/15 10:26:11 dashboard.go:147: [WARN] *******************************
错误2:删除group下的节点被锁
1 2 3 4 5 6 7 8 9 10 11 12 13 14 15 16 17 18 19 20 21 22 23 24 25 26 27 28 29 30 31 32 33 34 35 36 37 38 39 40 41 42 43 44 45 46 47 48 49 50 51 52 53 54 55 56 57 58 59 60 61 62 63 64 65 66 67 68 69 70 71 72 73 74 75 76 77 78 79 80 81 82 83 84 85 86 87 88 89 90 91 92 93 94 95 96 97 98 99 100 101 102 103 104 105 106 107 108 109 110 111 112 113 114 115 116 117 118 119 120 121 122 123 124 125 126 bin/codis-config server remove 2 10.19.21.241:6380 2015/09/15 10:29:41 main.go:153: [PANIC] run sub-command failed [error]: http status code 500, zkutil: obtaining lock timed out 4 /usr/local /codis/src/github.com/wandoulabs/codis/cmd/cconfig/utils.go:66 main.callApi 3 /usr/local /codis/src/github.com/wandoulabs/codis/cmd/cconfig/server_group.go:124 main.runRemoveServerFromGroup 2 /usr/local /codis/src/github.com/wandoulabs/codis/cmd/cconfig/server_group.go:57 main.cmdServer 1 /usr/local /codis/src/github.com/wandoulabs/codis/cmd/cconfig/main.go:86 main.runCommand 0 /usr/local /codis/src/github.com/wandoulabs/codis/cmd/cconfig/main.go:151 main.main ... ... [stack]: 0 /usr/local /codis/src/github.com/wandoulabs/codis/cmd/cconfig/main.go:153 main.main ... ... 同样到zk里删除整个db_test [zk: localhost:2181(CONNECTED) 5] ls /zk/codis/db_test [proxy, slots, servers, LOCK, migrate_tasks, actions, fence, ActionResponse, dashboard] [zk: localhost:2181(CONNECTED) 6] delete /zk/codis/db_test Node not empty: /zk/codis/db_test 停止服务 ps -ef |grep codis root 623 32515 0 10:26 pts/3 00:00:01 bin/codis-config -c config.ini dashboard root 1663 32515 0 10:35 pts/3 00:00:00 grep codis root 13115 1 0 Sep14 ? 00:00:42 bin/codis-server *:6379 root 13134 1 0 Sep14 ? 00:00:42 bin/codis-server *:6380 root 13210 1 0 Sep14 ? 00:00:41 bin/codis-server *:6480 root 13229 1 0 Sep14 ? 00:00:41 bin/codis-server *:6479 pkill codis 2015/09/15 10:35:29 dashboard.go:154: [INFO] removing dashboard node 2015/09/15 10:35:29 main.go:104: [PANIC] ctrl-c or SIGTERM found, exit [stack]: 0 /usr/local /codis/src/github.com/wandoulabs/codis/cmd/cconfig/main.go:104 main.func·010 ... ... [1]+ Exit 1 bin/codis-config -c config.ini dashboard ps -ef |grep codis root 1694 32515 0 10:35 pts/3 00:00:00 grep codis bin/codis-config action remove-lock 2015/09/15 10:50:29 action.go:331: [INFO] deleting../zk/codis/db_test/LOCK/lock-0000000038 { "msg" : "OK" , "ret" : 0 } bin/codis-config server list [ { "id" : 1, "product_name" : "test" , "servers" : [ { "addr" : "localhost:6380" , "group_id" : 1, "type" : "slave" }, { "addr" : "localhost:6379" , "group_id" : 1, "type" : "master" } ] }, { "id" : 2, "product_name" : "test" , "servers" : [ { "addr" : "10.19.21.241:6380" , "group_id" : 2, "type" : "offline" }, { "addr" : "localhost:6480" , "group_id" : 2, "type" : "master" } ] } ] bin/codis-config server remove 2 10.19.21.241:6380 2015/09/15 10:52:24 server_group.go:182: [INFO] {offline 2 10.19.21.241:6380} { "msg" : "OK" , "ret" : 0 } bin/codis-config server list [ { "id" : 1, "product_name" : "test" , "servers" : [ { "addr" : "localhost:6380" , "group_id" : 1, "type" : "slave" }, { "addr" : "localhost:6379" , "group_id" : 1, "type" : "master" } ] }, { "id" : 2, "product_name" : "test" , "servers" : [ { "addr" : "localhost:6480" , "group_id" : 2, "type" : "master" } ] } ]
错误3:Ulimit的大小问题
1 2 3 4 5 6 7 8 9 10 11 12 13 14 启动proxy的时候 bin/codis-proxy -c config.ini -L ./log /proxy.log –cpu=8 –addr=0.0.0.0:19000 –http-addr=0.0.0.0:11000 打印的log 显示了下面的问题: [code]2015/09/28 23:39:13 main.go:102: [PANIC] ulimit too small: 256, should be at least 1024 [stack]: 1 /usr/local /codis/src/github.com/wandoulabs/codis/cmd/proxy/main.go:102 main.checkUlimit 0 /usr/local /codis/src/github.com/wandoulabs/codis/cmd/proxy/main.go:166 main.main ... ... 这时候需要我们调大一下ulimit : $ ulimit -n 1024
使用过程中遇到的问题
codis-proxy的日志切割,codis-proxy的默认日志级别是info,日志量很大,我们这边每天产生50多G日志,目前codis-proxy还不支持热重启,想修改启动参数还是比较麻烦的,日志切割推荐用logrotate
codis-proxy的监听地址默认没有具体ipv4,也就是codis-proxy启动之后没有0.0.0.0:19000这样的监听,这样会导致的问题就是前端lvs没有办法负载均衡codis-proxy,不能转发请求过,这个问题已联系作者处理了,在codis-proxy启动的配置文件中加上proto=tcp4这个参数就支持监听ipv4了
添加Redis Server Group的时候,非codis-server(原生的redis)竟然也能加入到codis集群里面,在redis和codis-server共存在一个物理机上的清楚,很容易加错,希望能有个验证,非codis-server不能加入到codis集群
codis集群内部通讯是通过主机名的,如果主机名没有做域名解析那dashboard是通过主机名访问不到proxy的http-addr地址的,这会导致从web界面上看不到OP/s的数据,至于还有没有其他问题,目前我这边还没有发现,建议内部通讯直接用内网IP
参考文档 http://www.google.com http://navyaijm.blog.51cto.com/4647068/1637688 http://www.cnblogs.com/xuanzhi201111/p/4425194.html http://467754239.blog.51cto.com/4878013/1728423