前段时间公司根据要求需要将聚石塔上服务器从杭州整体迁移到张家口,刚好趁这次机会将这些乱七八糟的服务器做一次梳理和整合。断断续续一个月迁移完成大概优化掉了 1/3 的机器,完成之后遇到了一些问题,比如:曾经零零散散部署在生产上一些可视化 UI:Apollo、Kibana、Grafana、Jenkins 等等服务,这些服务都采用了 80 或者其它公网端口进行对外暴露。为了安全,现在不再开放非 80 之外的公网端口。由于机器少了,80 端口不够,这些可视化 UI 不再能直接访问到了。所以需另寻其他出路。
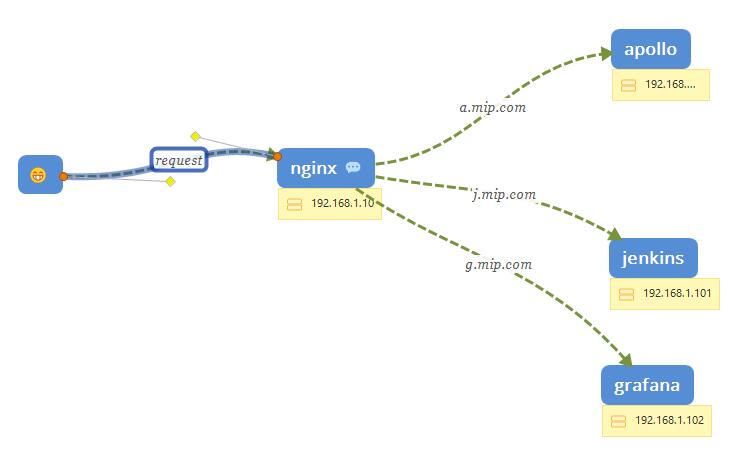
用 Nginx 做反向代理 为了解决这两个问题,自然第一反应想到的就是使用反向代理,我的理想构思下应该是下图这样的。
既用户所有的请求都经过 Nginx,让 Nginx 来判断当前 URL 需要跳转到哪一个后端代理上。比较好的策略应该是让 Nginx 来判断当前的 Host 是什么来决定跳转到哪一个后端的 Webserver 上,比如: a.mip.com 就跳转到 Apollo,j.mip.com 就跳转到 Jenkins。以此类推,这样就可以完美解决了。
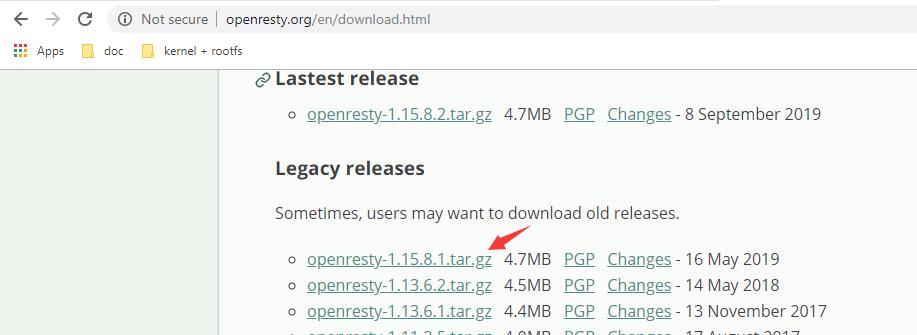
一个完整的演示实例 为了实现上面的需求,在 Nginx 中你完全可以使用 Rewrite 模块下 if 指令来完成。由于 Nginx 默认带的模块比较少,如果需使用第三方模块,你可能还需要重新编译 Nginx。所以这里直接使用 OpenResty,它扩展了 Nginx,并且集成了很多成熟的 LUA 模块。可自行下载最新的 1.15.8 版本,其安装方式和 Nginx 一模一样。
项目地址:https://openresty.org/en/download.html
OpenResty 默认是安装到 /usr/local/ 目录下,当你看到有一个 openresty 目录就表示你安装成功。
1
2
3
4
[root@localhost local ] bin etc games include lib lib64 libexec openresty sbin share src [root@localhost local ] /usr/local
接下来你可以使用 nginx -v 来验证下 OpenResty 版本号。
1
2
3
4
5
[root@localhost sbin] /usr/local /openresty/nginx/sbin [root@localhost sbin] [root@localhost sbin] nginx version: openresty/1.15.8.1
为了演示方便,我就直接使用 Nginx 开启三个 Server。
1
2
3
192.168.23.129:80 192.168.23.129:8001 192.168.23.129:8002
首先,我们在 Nginx 中的配置好三个网站。
Apollo 配置片断
1
2
3
4
5
6
7
8
server { listen 8001; server_name somename alias another.alias; location / { root html; index apollo.html; } }
8001 端口网站的默认页是 apollo.html,这个 apollo.html 所在路径就是在 Nginx 目录下的 html 目录,如下所示。
1
2
3
4
[root@localhost html] /usr/local /openresty/nginx/html [root@localhost html] 50x.html apollo.html index.html jenkins.html
Jenkins 配置片断
Jenkins.html 的文件所在路径如下所示,不再赘述。
1
2
3
4
5
6
7
8
server { listen 8002; server_name somename alias another.alias; location / { root html; index jenkins.html; } }
Proxy 配置片断
我们可以看到,这里只需要使用 Rewrite 模块下的 if 条件语句。然后通过 $host 系统变量判断当前的 URL 中的 host 的值来实现跳转到相应的网站。
1
2
3
4
5
6
7
8
9
10
11
12
13
14
server { listen 80; server_name localhost; location / { if ($host = "a.mip.com") { proxy_pass http://localhost:8001; } if ($host = "j.mip.com") { proxy_pass http://localhost:8002; } }
其次,我们做好对应域名关系映射。这里为了演示方便,我们直接在 hosts 文件中进行配置。
1
2
3
$ cat /etc/hosts 192.168.23.129 a.mip.com 192.168.23.129 j.mip.com
最后,启动 Nginx。
1
2
3
4
5
6
7
8
9
10
11
12
13
[root@localhost sbin] [root@localhost sbin] [root@localhost sbin] [root@localhost sbin] Active Internet connections (only servers) Proto Recv-Q Send-Q Local Address Foreign Address State PID/Program name tcp 0 0 0.0.0.0:8001 0.0.0.0:* LISTEN 3802/nginx: master tcp 0 0 0.0.0.0:8002 0.0.0.0:* LISTEN 3802/nginx: master tcp 0 0 0.0.0.0:80 0.0.0.0:* LISTEN 3802/nginx: master tcp 0 0 0.0.0.0:22 0.0.0.0:* LISTEN 1172/sshd tcp 0 0 127.0.0.1:25 0.0.0.0:* LISTEN 1724/master tcp6 0 0 :::22 :::* LISTEN 1172/sshd tcp6 0 0 ::1:25 :::* LISTEN 1724/master
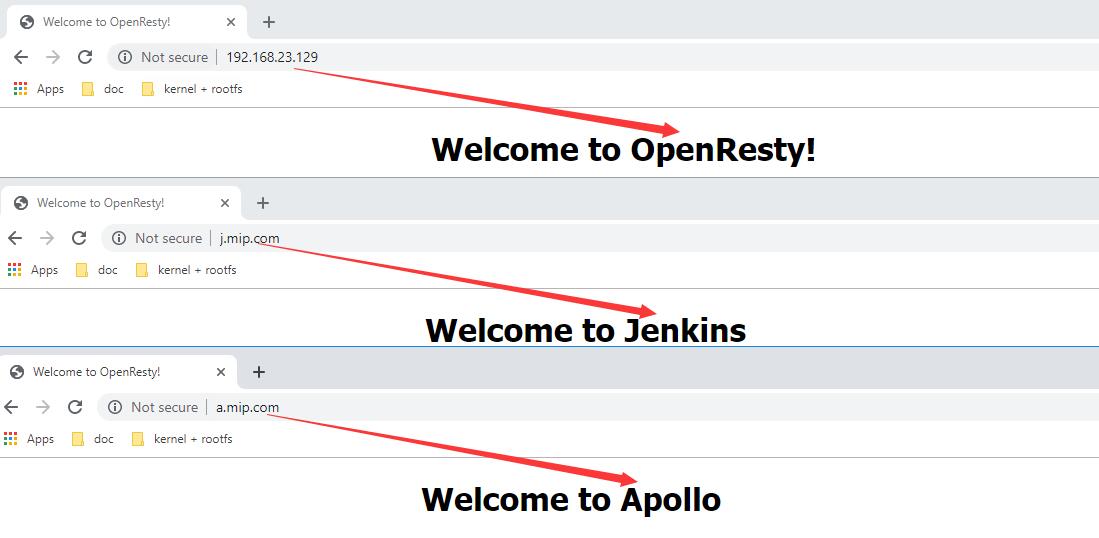
通过上面输出看到,80、8001、8002 端口都已经开启了,接下来大家可以到浏览器去验证一下了。
从上图中,我们可以看到通过不同域名成功的访问到了不同的后端应用。以下是全部的 Nginx 配置文件:
1
2
3
4
5
6
7
8
9
10
11
12
13
14
15
16
17
18
19
20
21
22
23
24
25
26
27
28
29
30
31
32
33
34
35
36
37
38
39
40
41
42
43
44
45
46
47
48
49
50
51
52
53
54
55
56
57
58
59
60
61
62
63
64
65
66
67
68
69
70
71
72
73
74
75
76
77
78
79
80
81
82
83
84
85
86
87
88
89
90
91
92
93
94
95
96
97
98
99
100
101
102
103
104
105
106
107
108
109
110
111
112
113
114
115
116
117
118
119
120
121
122
123
124
125
126
127
128
129
130
131
132
133
134
135
136
137
138
139
140
$ cat nginx.conf #user nobody; worker_processes 1; #error_log logs/error.log; #error_log logs/error.log notice; #error_log logs/error.log info; #pid logs/nginx.pid; events { worker_connections 1024; } http { include mime.types; default_type application/octet-stream; log_format main '$host ----> $remote_addr - $remote_user [$time_local] "$request" ' '$status $body_bytes_sent "$http_referer" ' '"$http_user_agent" "$http_x_forwarded_for"'; access_log logs/access.log main; sendfile on; #tcp_nopush on; #keepalive_timeout 0; keepalive_timeout 65; #gzip on; server { listen 80; server_name localhost; #charset koi8-r; #access_log logs/host.access.log main; # location = /get { # set_unescape_uri $key $arg_key; # this requires ngx_set_misc # redis2_query get $key; # redis2_pass 10.105.13.174:6379; # } location / { if ($host = "a.mip.com") { proxy_pass http://localhost:8001; } if ($host = "j.mip.com") { proxy_pass http://localhost:8002; } root html; index index.html index.htm; } #error_page 404 /404.html; # redirect server error pages to the static page /50x.html # error_page 500 502 503 504 /50x.html; location = /50x.html { root html; } # proxy the PHP scripts to Apache listening on 127.0.0.1:80 # #location ~ \.php$ { # proxy_pass http://127.0.0.1; #} # pass the PHP scripts to FastCGI server listening on 127.0.0.1:9000 # #location ~ \.php$ { # root html; # fastcgi_pass 127.0.0.1:9000; # fastcgi_index index.php; # fastcgi_param SCRIPT_FILENAME /scripts$fastcgi_script_name; # include fastcgi_params; #} # deny access to .htaccess files, if Apache's document root # concurs with nginx's one # #location ~ /\.ht { # deny all; #} } # another virtual host using mix of IP-, name-, and port-based configuration # server { listen 8001; server_name somename alias another.alias; location / { root html; index apollo.html; } } server { listen 8002; server_name somename alias another.alias; location / { root html; index jenkins.html; } } # HTTPS server # #server { # listen 443 ssl; # server_name localhost; # ssl_certificate cert.pem; # ssl_certificate_key cert.key; # ssl_session_cache shared:SSL:1m; # ssl_session_timeout 5m; # ssl_ciphers HIGH:!aNULL:!MD5; # ssl_prefer_server_ciphers on; # location / { # root html; # index index.html index.htm; # } #} }
至此,我们就演示完了一个反向代理实现多个不同类型的后端网站访问的场景,希望本篇文章对你有所帮助!
来源:博客园
原文:https://url.cn/5iSfcUN
题图:来自谷歌图片搜索
版权:本文版权归原作者所有
投稿:欢迎投稿,邮箱: editor@hi-linux.com


