如果你经常需要通过终端以非交互模式访问网络服务器(例如,从网络上下载文件,或者是测试RESTful网络服务接口),可能你会选择的工具是wget或curl。
HTTPie(读aych-tee-tee-pie)是一款开源的命令行HTTP工具。HTTPie采用Python开发,底层用到了Requests和Pygments库。HTTPie设计用来增强wget和curl的可用性。它的主要目标是使通过命令行与网络服务器进行交互的过程变得尽可能的人性化。其提供了一个简单的HTTP环境来让我们通过简单而自然的语法发送任意HTTP请求,并显示彩色输出。HTTPie可用于测试,调试和与HTTP服务器进行普通的交互。
官方主页: http://httpie.org/
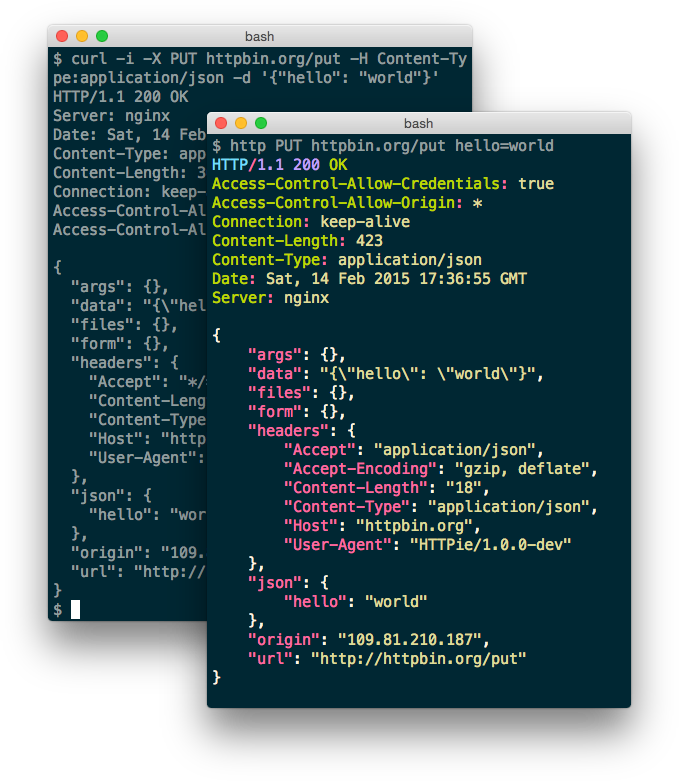
先展示一下HTTPie官方的一个HTTPie VS cURL的图给大家看看。
安装HTTPie
Linux
HTTPie是用Python写的,所以你可以在几乎所有地方(Linux,MacOSX,Windows)安装它。而且,在大多数的Linux发行版中都有编译好的安装包。
Debian、Ubuntu或者Linux Mint
1 | $ sudo apt-get install httpie |
Fedora
1 | $ sudo yum install httpie |
CentOS/RHEL(Centos7需启用EPEL源)
首先,启用EPEL仓库,然后运行
1 | $ sudo yum install httpie |
对于任何Linux发行版,另一个安装方法使用pip。
1 | $ sudo pip install --upgrade httpie |
Mac OS X
1 | $ brew install httpie |
HTTPie使用
当你安装完HTTPie后,你可以通过输入http命令来调用它。
标准命令格式
1 | http [flags] [METHOD] URL [ITEM [ITEM]] |
先看一个示例
1 | $ http PUT httpbin.org/put hello=world Referer:http://www.imike.me |
定制头部
你可以使用<header:value>的格式来定制头部。例如,我们发送一个HTTP GET请求到www.test.com ,使用定制用户代理(user-agent)和来源(referer),还有定制头部(比如MyParam)。
1 | $ http www.test.com User-Agent:Xmodulo/1.0 Referer:http://www.imike.me MyParam:Foo |
注意到当使用HTTP GET方法时,就无需明确指定HTTP方法。
这个HTTP请求看起来如下
1 | GET / HTTP/1.1 |
上传文件
1 | $ http post http://127.0.0.1:8080/login < /root/1.py |
下载文件
你可以把http作为文件下载器来使用。你需要像下面一样把输出重定向到文件。
1 | $ http www.test.com/my_file.zip > my_file.zip |
或者
1 | $ http --download www.test.com/my_file.zip |
或者
1 | $ http -d {url} #支持https |
使用其他HTTP方法
除了默认的GET方法,你还可以使用其他方法(比如PUT、POST、DELETE、HEAD)。
发送一个HTTP PUT请求
1 | $ http PUT www.test.com name='Dan Nanni' email='dan@email.com' |
发送POST数据
提交表单
使用http命令提交表单很容易,如下
1 | $ http -f POST www.test.com name='Dan Nanni' comment='Hi there' |
-f选项使http命令序列化数据字段,并将Content-Type设置为application/x-www-form-urlencoded; charset=utf-8。
这个HTTP POST 请求看起来如下
1 | POST / HTTP/1.1 |
模拟Form的上传, Content-Type: multipart/form-data
1 | $ http -f POST test.com/jobs name='John Smith' file@~/test.pdf |
模拟HEAD方法
1 | $ http HEAD www.imike.me |
HEAD这个方法只会让服务器返回http response headers。
这个命令结果如下
1 | Request |
请求删除的方法
1 | $ http DELETE test.com |
修改请求头
使用:分隔
1 | $ http test.com User-Agent:Yhz/1.0 'Cookie:a=b;b=c' Referer:http://imike.me/ |
认证
1 | $ http -a username:password test.com |
JSON支持
HTTPie内置JSON的支持。事实上HTTPie默认使用的内容类型(content-type)就是application/json。因此,当你不指定内容类型发送数据字段时,它们会自动序列化为JSON对象。
1 | $ http http://127.0.0.1:8080/snippets/1/ |
传递JSON数据请求(默认就是JSON数据请求)
1 | $ http PUT test.com name=nate password=nate_password |
如果JSON数据存在不是字符串则用:=分隔,例如
1 | $ http PUT test.com name=nate password=nate_password age:=28 a:=true streets:='["a", "b"]' |
输入重定向
HTTPie的另外一个用户友好特性是输入重定向,你可以使用缓冲数据提供HTTP请求内容。例如
1 | $ http POST api.test.com/db/lookup < my_info.json |
或者
1 | $ echo '{"name": "Dan Nanni"}' | http POST api.test.com/db/lookup |
使用http代理
1 | $ http --proxy=http:127.0.0.1:8087 youtube.com |
显示详细的请求
1 | $ http -v test.com |
只显示Header
1 | $ http -h test.com |
只显示Body
1 | $ http -b test.com |
进阶用法
看全部并跟随跳转
1 | $ http --follow httpbin.org/redirect/3 |
下载图片,然后用imagemagick转化,然后上传到另外一个网站
1 | $ http octodex.github.com/images/original.jpg | convert - -resize 25% - | http test.com/Octocats |
把认证信息放到session里
1 | $ http --session=user1 -a user1:password test.com X-Foo:Bar |
使用之前认证过后的session继续访问
1 | $ http --session=user1 test.com |
参考文档
http://www.google.com
https://github.com/jkbrzt/httpie
http://lingxiankong.github.io/blog/2014/08/19/curl-httpie/
http://www.rendoumi.com/httpdiao-shi-de-ling-yi-li-qi-httpie/